
Following the launch of trove.scot in February 2025 we are now planning the retiral of some of our webservices. Canmore will be switched off on 24th June 2025. Information about the closure can be found on the HES website: Retiral of HES web services | Historic Environment Scotland
Stirling Railway Station, Middle Signal Box


Signal Box (20th Century)
Site Name Stirling Railway Station, Middle Signal Box
Classification Signal Box (20th Century)
Canmore ID 317769
Site Number NS79SE 896
NGR NS 79973 93331
Datum OSGB36 - NGR
Permalink http://canmore.org.uk/site/317769
Ordnance Survey licence number AC0000807262. All rights reserved.
Canmore Disclaimer.
© Bluesky International Limited 2025. Public Sector Viewing Terms
- Correction
- Favourite

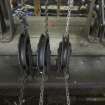
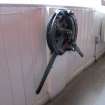
DP 143293
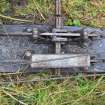
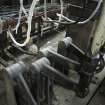
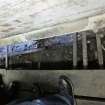
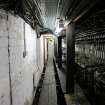
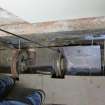
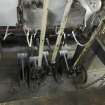
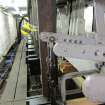
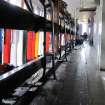
Interior. Locking Room, track side. Detail of pulley wheels guiding signal chain and wire, attached to lever and to signal bar above, which run under the walkway on south west side of signal box.
Records of the Royal Commission on the Ancient and Historical Monuments of Scotland (RCAHMS), Edinbu
8/2012
© Crown Copyright: HES
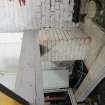
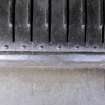
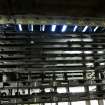
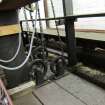
![Interior. Locking Room. Vertical Locking Tray and levers, track side. Detail. The [sword] tappets are visible at the top of the locking tray. The Locking Tray contains locking bars which connect to dogs to other dogs allowing locking or movement of the tappets (in turn connected to the levers operated from the first floor of the signal box). This is a Glasgow 'new style' design of vertical locking tray.](http://i.rcahms.gov.uk/canmore/l/DP00143299.jpg)
DP 143299
Interior. Locking Room. Vertical Locking Tray and levers, track side. Detail. The [sword] tappets are visible at the top of the locking tray. The Locking Tray contains locking bars which connect to dogs to other dogs allowing locking or movement of the tappets (in turn connected to the levers operated from the first floor of the signal box). This is a Glasgow 'new style' design of vertical locking tray.
Records of the Royal Commission on the Ancient and Historical Monuments of Scotland (RCAHMS), Edinbu
8/2012
© Crown Copyright: HES

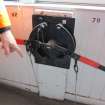
DP 143307
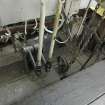
Interior. Locking Room. View along locking frame which sits below the bench (frame which guides the signal levers at first floor level), from south. Here we see a weighted lever painted black and yellow. These give extra purchase to levers which operate far flung signals. In this case, a signal 456 yards away from the signal box. The locking tray, levers and tails are visible.
Records of the Royal Commission on the Ancient and Historical Monuments of Scotland (RCAHMS), Edinbu
8/2012
© Crown Copyright: HES

DP 143311
Interior. Locking Room. Detail of frame where signal levers removed.
Records of the Royal Commission on the Ancient and Historical Monuments of Scotland (RCAHMS), Edinbu
8/2012
© Crown Copyright: HES

DP 143313
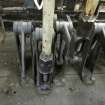
nterior. Locking Room. Locking frame timber with later inserted pillar.
Records of the Royal Commission on the Ancient and Historical Monuments of Scotland (RCAHMS), Edinbu
8/2012
© Crown Copyright: HES

DP 143316
Interior. Locking Room. Locking frame, detail of Stevens end frame. The frame has the bench at the top which guides the levers as they engage and disengage with the locking tray via the tappets attached to the levers. the tappets then engage with the locking tray mechanism. The lever tails in turn move the pulley chains and wires which operate the signals.
Records of the Royal Commission on the Ancient and Historical Monuments of Scotland (RCAHMS), Edinbu
8/2012
© Crown Copyright: HES

DP 143317
Interior. Locking Room. Locking frame, detail of Stevens end frame.
Records of the Royal Commission on the Ancient and Historical Monuments of Scotland (RCAHMS), Edinbu
8/2012
© Crown Copyright: HES

DP 143318
Interior. Locking Room. Locking frame, detail of timber framing supporting Stevens frame.
Records of the Royal Commission on the Ancient and Historical Monuments of Scotland (RCAHMS), Edinbu
8/2012
© Crown Copyright: HES

DP 143320
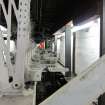
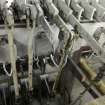
Interior. Locking Room, from north west, locking tray at top of picture, levers and their tails. the chains attached to the lever tails engagewith wires which operate the signals soem distance from the signal box.
Records of the Royal Commission on the Ancient and Historical Monuments of Scotland (RCAHMS), Edinbu
8/2012
© Crown Copyright: HES

DP 143323
Interior. Locking Room. Locking frame timber support resting on brick built plinth.
Records of the Royal Commission on the Ancient and Historical Monuments of Scotland (RCAHMS), Edinbu
8/2012
© Crown Copyright: HES

DP 143328
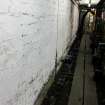
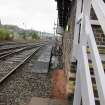
View of east side of box showing signal operating wires.
Records of the Royal Commission on the Ancient and Historical Monuments of Scotland (RCAHMS), Edinbu
8/2012
© Crown Copyright: HES

DP 143331
View of east side of box showing signal operating wires.
Records of the Royal Commission on the Ancient and Historical Monuments of Scotland (RCAHMS), Edinbu
8/2012
© Crown Copyright: HES

DP 143335
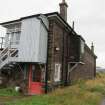
View of box from south.
Records of the Royal Commission on the Ancient and Historical Monuments of Scotland (RCAHMS), Edinbu
8/2012
© Crown Copyright: HES

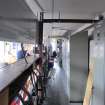
DP 143339
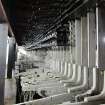
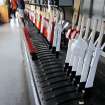
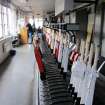
Interior. Signal Box. Lever Frame (96 levers) by Stevens, Glasgow Pattern. The floor below this is called the Locking Room. this contains the locking frame apparatus which operates the signals via levers, pulleys, chains and wires.
Records of the Royal Commission on the Ancient and Historical Monuments of Scotland (RCAHMS), Edinbu
8/2012
© Crown Copyright: HES

DP 143344
Interior. Signal Box. Detail of lever as it meets bench, by Stevens, Glasgow Pattern.
Records of the Royal Commission on the Ancient and Historical Monuments of Scotland (RCAHMS), Edinbu
8/2012
© Crown Copyright: HES

DP 143351
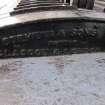
Interior. Signal Box. Detail of lever bench name plate, south end, by Stevens, Glasgow Pattern
Records of the Royal Commission on the Ancient and Historical Monuments of Scotland (RCAHMS), Edinbu
8/2012
© Crown Copyright: HES

DP 143363
Interior. Signal Box. Alloa Line modern signalling system.
Records of the Royal Commission on the Ancient and Historical Monuments of Scotland (RCAHMS), Edinbu
8/2012
© Crown Copyright: HES

DP 143365
Interior. Signal Box. Alloa Line modern signalling system.
Records of the Royal Commission on the Ancient and Historical Monuments of Scotland (RCAHMS), Edinbu
8/2012
© Crown Copyright: HES

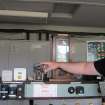
DP 143371
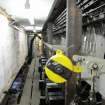
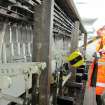
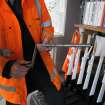
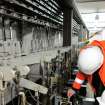
Interior. Signal Box. Signalman operating levers.
Records of the Royal Commission on the Ancient and Historical Monuments of Scotland (RCAHMS), Edinbu
8/2012
© Crown Copyright: HES

DP 143378
Interior. Signal Box. Rear of lever bench
Records of the Royal Commission on the Ancient and Historical Monuments of Scotland (RCAHMS), Edinbu
8/2012
© Crown Copyright: HES

DP 143295
Interior. Locking Room. Detail. Locking frame, track side. Stirrup connections to vertical or predestal 'L' cranks.
Records of the Royal Commission on the Ancient and Historical Monuments of Scotland (RCAHMS), Edinbu
8/2012
© Crown Copyright: HES

DP 143305
Interior. Locking Room. Opening for signal connections from vertical locking frame to signals.
Records of the Royal Commission on the Ancient and Historical Monuments of Scotland (RCAHMS), Edinbu
8/2012
© Crown Copyright: HES

DP 143308
Interior. Locking Room. Opening for connections pulleys and tension wires and signal chains.
Records of the Royal Commission on the Ancient and Historical Monuments of Scotland (RCAHMS), Edinbu
8/2012
© Crown Copyright: HES

DP 143329
View of east side of box showing signal operating wires.
Records of the Royal Commission on the Ancient and Historical Monuments of Scotland (RCAHMS), Edinbu
8/2012
© Crown Copyright: HES

DP 143338
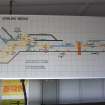
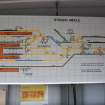
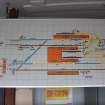
Interior. Signal Box. One of four images showing signal diagram.
Records of the Royal Commission on the Ancient and Historical Monuments of Scotland (RCAHMS), Edinbu
8/2012
© Crown Copyright: HES

DP 143340
Interior. Signal Box. One of four images showing signal diagram.
Records of the Royal Commission on the Ancient and Historical Monuments of Scotland (RCAHMS), Edinbu
8/2012
© Crown Copyright: HES

DP 143349
Interior. Signal Box. South end. Detail of disused levers for signal wire adjusting.
Records of the Royal Commission on the Ancient and Historical Monuments of Scotland (RCAHMS), Edinbu
8/2012
© Crown Copyright: HES

DP 143350
Interior. Signal Box. South end. Detail of levers for wire adjusting. Uses a chain and pin locking system.
Records of the Royal Commission on the Ancient and Historical Monuments of Scotland (RCAHMS), Edinbu
8/2012
© Crown Copyright: HES

DP 143354
Interior. Signal Box. Lever Frame (96 levers) by Stevens, Glasgow Pattern. Telegraph from which code sent to indicate completion of signal changes. Block instrument on right.
Records of the Royal Commission on the Ancient and Historical Monuments of Scotland (RCAHMS), Edinbu
8/2012
© Crown Copyright: HES

DP 143375
Interior. Signal Box. Detail of levers
Records of the Royal Commission on the Ancient and Historical Monuments of Scotland (RCAHMS), Edinbu
8/2012
© Crown Copyright: HES

DP 143379
Interior. Signal Box. Rear of lever bench
Records of the Royal Commission on the Ancient and Historical Monuments of Scotland (RCAHMS), Edinbu
8/2012
© Crown Copyright: HES

DP 143292
Interior. Locking Room. View along Steven’s vertical locking frame from north west (non-track side) which sits below the bench (frame which guides the signal levers at first floor level. Each tappet slots into the locking tray through a slot know as a race.
Records of the Royal Commission on the Ancient and Historical Monuments of Scotland (RCAHMS), Edinbu
8/2012
© Crown Copyright: HES

DP 143306
Interior. Locking Room. View along locking frame which sits below the bench (frame which guides the signal levers at first floor level), from north. Here we see a weighted lever painted black and yellow. These give extra purchase to levers which operate far flung signals. In this case, a signal 456 yards away from the signal box. The locking tray, levers and tails are visible.
Records of the Royal Commission on the Ancient and Historical Monuments of Scotland (RCAHMS), Edinbu
8/2012
© Crown Copyright: HES

DP 143326
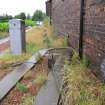
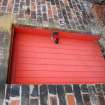
View of signal box from north east. The Locking Room access.
Records of the Royal Commission on the Ancient and Historical Monuments of Scotland (RCAHMS), Edinbu
8/2012
© Crown Copyright: HES

DP 143336
View of signal box track side from south.
Records of the Royal Commission on the Ancient and Historical Monuments of Scotland (RCAHMS), Edinbu
8/2012
© Crown Copyright: HES

DP 143346
Interior. Signal Box. Override crank handle for signals.
Records of the Royal Commission on the Ancient and Historical Monuments of Scotland (RCAHMS), Edinbu
8/2012
© Crown Copyright: HES

DP 143357
Interior. Signal Box. Detail of Stirling North Main Line, Block instrument.
Records of the Royal Commission on the Ancient and Historical Monuments of Scotland (RCAHMS), Edinbu
8/2012
© Crown Copyright: HES

DP 143358
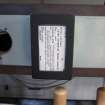
Interior. Signal Box. Original clock board.
Records of the Royal Commission on the Ancient and Historical Monuments of Scotland (RCAHMS), Edinbu
8/2012
© Crown Copyright: HES

DP 143360
Historic photograph (?1940s/50s) of interior of Stirling Middle Signal Box.
Records of the Royal Commission on the Ancient and Historical Monuments of Scotland (RCAHMS), Edinbu
8/2012
© Crown Copyright: HES

DP 143364
Interior. Signal Box. Alloa Line modern signalling system.
Records of the Royal Commission on the Ancient and Historical Monuments of Scotland (RCAHMS), Edinbu
8/2012
© Crown Copyright: HES

DP 143377
Interior. Signal Box. General view.
Records of the Royal Commission on the Ancient and Historical Monuments of Scotland (RCAHMS), Edinbu
8/2012
© Crown Copyright: HES

DP 143290
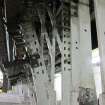
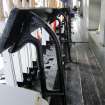
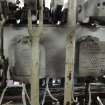
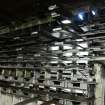
Interior. Locking Room. View along vertical locking frame from north west. The vertical locking tray (top) containing locking bars, levers and tails with their chains which in turn are attached to wires run through pulleys. These in turn operate the signals on the track outside.
Records of the Royal Commission on the Ancient and Historical Monuments of Scotland (RCAHMS), Edinbu
8/2012
© Crown Copyright: HES

DP 143294
Interior. Locking Room. Locking frame, track side. Detail. View of lever tails, their connecting rods to the vertical or pedesttal 'L' cranks. The swithc boxes contain either electrical detection switches or interlock incorporated via the linkage.Chain pulley visible botton right.
Records of the Royal Commission on the Ancient and Historical Monuments of Scotland (RCAHMS), Edinbu
8/2012
© Crown Copyright: HES

DP 143309
Interior. Locking Room. Opening for connections pulleys and tension wires and signal chains.
Records of the Royal Commission on the Ancient and Historical Monuments of Scotland (RCAHMS), Edinbu
8/2012
© Crown Copyright: HES

DP 143330
View of east side of box showing signal operating wires.
Records of the Royal Commission on the Ancient and Historical Monuments of Scotland (RCAHMS), Edinbu
8/2012
© Crown Copyright: HES

DP 143333
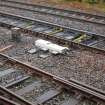
View from east of semaphore signal. Wire connections visible at bottom of picture.
Records of the Royal Commission on the Ancient and Historical Monuments of Scotland (RCAHMS), Edinbu
8/2012
© Crown Copyright: HES

DP 143342
Interior. Signal Box. Lever Frame (96 levers) by Stevens, Glasgow Pattern. The floor below this is called the Locking Room. this contains the locking frame apparatus which operates the signals via levers, pulleys, chains and wires.
Records of the Royal Commission on the Ancient and Historical Monuments of Scotland (RCAHMS), Edinbu
8/2012
© Crown Copyright: HES

DP 143347
Modern signalling equipment trackside.
Records of the Royal Commission on the Ancient and Historical Monuments of Scotland (RCAHMS), Edinbu
8/2012
© Crown Copyright: HES

DP 143348
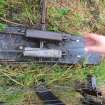
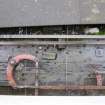
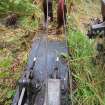
Mechanical signal operating wires, track side. These exit the signal box at ground level.
Records of the Royal Commission on the Ancient and Historical Monuments of Scotland (RCAHMS), Edinbu
8/2012
© Crown Copyright: HES

DP 143361
Historic photograph (?1940s/50s) of interior of Stirling Middle Signal Box.
Records of the Royal Commission on the Ancient and Historical Monuments of Scotland (RCAHMS), Edinbu
8/2012
© Crown Copyright: HES

DP 143367
Interior. Signal Box. Alloa Line modern signalling system.
Records of the Royal Commission on the Ancient and Historical Monuments of Scotland (RCAHMS), Edinbu
8/2012
© Crown Copyright: HES

DP 143381
Interior. Signal Box. Rear of lever bench
Records of the Royal Commission on the Ancient and Historical Monuments of Scotland (RCAHMS), Edinbu
8/2012
© Crown Copyright: HES

DP 143382
Interior. Signal Box. Detail of lever bench.
Records of the Royal Commission on the Ancient and Historical Monuments of Scotland (RCAHMS), Edinbu
8/2012
© Crown Copyright: HES

DP 143322
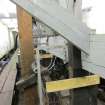
Interior. Locking Room. Locking frame, sitting on large timber running the length of the locking room. The lever tails and their chanins for working the signal wires are visible. The signal wires run out of the signal box and are attached to the signals on the track some distance from the signal box.
Records of the Royal Commission on the Ancient and Historical Monuments of Scotland (RCAHMS), Edinbu
8/2012
© Crown Copyright: HES

DP 143325
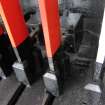
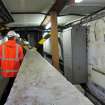
View of signal box from north east. The Locking Room access is the red door to the right of the picture.
Records of the Royal Commission on the Ancient and Historical Monuments of Scotland (RCAHMS), Edinbu
8/2012
© Crown Copyright: HES

DP 143327
Detail from north.
Records of the Royal Commission on the Ancient and Historical Monuments of Scotland (RCAHMS), Edinbu
8/2012
© Crown Copyright: HES

DP 143332
View of east side of box showing signal operating wires.
Records of the Royal Commission on the Ancient and Historical Monuments of Scotland (RCAHMS), Edinbu
8/2012
© Crown Copyright: HES

DP 143368
Interior. Signal Box. Alloa Line modern signalling system.
Records of the Royal Commission on the Ancient and Historical Monuments of Scotland (RCAHMS), Edinbu
8/2012
© Crown Copyright: HES

DP 143383
Interior view of middle signal box, Stirling Station, showing detail of lever bench.
Records of the Royal Commission on the Ancient and Historical Monuments of Scotland (RCAHMS), Edinbu
8/2012
© Crown Copyright: HES

DP 143296
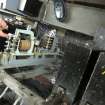
Interior. Locking Room. Locking frame, detail. The components, left to right are: linkage, posssible electric switch for electric signal; connecting rods attached to pedestal 'L' crank ; detector/interlock electric switch; lever tail. The 'L' crank at the bottom left of the image is an angle crank which appears to have been superceeded by an electric switch and linkage above.
Records of the Royal Commission on the Ancient and Historical Monuments of Scotland (RCAHMS), Edinbu
8/2012
© Crown Copyright: HES

DP 143301
Interior. Locking Room. Locking frame, detail. Electrical boxes attached to timber frame.
Records of the Royal Commission on the Ancient and Historical Monuments of Scotland (RCAHMS), Edinbu
8/2012
© Crown Copyright: HES

DP 143312
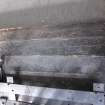
Interior. Locking Room. View along locking tray which sits below the bench (frame which guides the signal levers at first floor level). Tappets connected to the levers have been removed. Each tappet slots into the locking tray through a slot know as a race. Th locking bar slides in the locking tray within ribs at right angles to the tappet
Records of the Royal Commission on the Ancient and Historical Monuments of Scotland (RCAHMS), Edinbu
8/2012
© Crown Copyright: HES

DP 143315
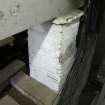
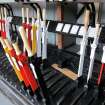
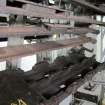
Interior. Locking Room. Spare weights for signal levers. .
Records of the Royal Commission on the Ancient and Historical Monuments of Scotland (RCAHMS), Edinbu
8/2012
© Crown Copyright: HES

DP 143319
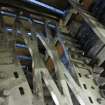
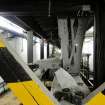
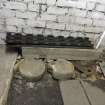
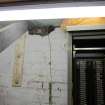
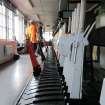
Interior. Locking Room. South end, showing recent building works incorporating timber truss.
Records of the Royal Commission on the Ancient and Historical Monuments of Scotland (RCAHMS), Edinbu
8/2012
© Crown Copyright: HES

DP 143321
Interior. Locking Room. Locking frame, detail of pulley wheels and tension wires.
Records of the Royal Commission on the Ancient and Historical Monuments of Scotland (RCAHMS), Edinbu
8/2012
© Crown Copyright: HES

DP 143337
Interior. Signal Box. One of four images showing signal diagram.
Records of the Royal Commission on the Ancient and Historical Monuments of Scotland (RCAHMS), Edinbu
8/2012
© Crown Copyright: HES

DP 143341
Interior. Signal Box. Lever Frame (96 levers) by Stevens, Glasgow Pattern.
Records of the Royal Commission on the Ancient and Historical Monuments of Scotland (RCAHMS), Edinbu
8/2012
© Crown Copyright: HES

DP 143352
Interior. Signal Box. Lever Frame (96 levers) by Stevens, Glasgow Pattern.
Records of the Royal Commission on the Ancient and Historical Monuments of Scotland (RCAHMS), Edinbu
8/2012
© Crown Copyright: HES

DP 143355
Interior. Signal Box. Lever Frame (96 levers) by Stevens, Glasgow Pattern. Telegraph messaging from which code sent to indicate completion of signal changes for Stirling North Main Line to adjacent signal boxes on the line.
Records of the Royal Commission on the Ancient and Historical Monuments of Scotland (RCAHMS), Edinbu
8/2012
© Crown Copyright: HES

DP 143359
Historic photograph (?1940s/50s) of interior of Stirling Middle Signal Box.
Records of the Royal Commission on the Ancient and Historical Monuments of Scotland (RCAHMS), Edinbu
8/2012
© Crown Copyright: HES

DP 143372
Interior. Signal Box. Signalman operating levers.
Records of the Royal Commission on the Ancient and Historical Monuments of Scotland (RCAHMS), Edinbu
8/2012
© Crown Copyright: HES

DP 143374
Interior. Signal Box. Detail of lever
Records of the Royal Commission on the Ancient and Historical Monuments of Scotland (RCAHMS), Edinbu
8/2012
© Crown Copyright: HES

DP 143291
Interior. Locking Room. Vertical Locking Tray in Locking Frame frame from north west, detail of sword tappets (Glasgow old above, Glasgow new below). A tappet is a steel blade connected to the signal changing lever just below the signal box floor. Each tappet slides through a race on the locking tray when the lever is brought forward by the signal operator.
Records of the Royal Commission on the Ancient and Historical Monuments of Scotland (RCAHMS), Edinbu
8/2012
© Crown Copyright: HES

DP 143304
Interior. Locking Room, track side. Locking frame, detail. View of electric locks (?) for either levers or for detection of signal change.
Records of the Royal Commission on the Ancient and Historical Monuments of Scotland (RCAHMS), Edinbu
8/2012
© Crown Copyright: HES

DP 143310
Interior. Locking Room. View along locking frame which sits below the bench (frame which guides the signal levers at first floor level), from south. Here we see a weighted lever painted black and yellow. These give extra purchase to levers which operate far flung signals. In this case, a signal 456 yards away from the signal box. The locking tray, levers and tails are visible.
Records of the Royal Commission on the Ancient and Historical Monuments of Scotland (RCAHMS), Edinbu
8/2012
© Crown Copyright: HES

DP 143324
Interior. Locking Room. Timber on which locking frame rests. At south end there appears to have been room for frame expansion.
Records of the Royal Commission on the Ancient and Historical Monuments of Scotland (RCAHMS), Edinbu
8/2012
© Crown Copyright: HES

DP 143343
Interior. Signal Box. Detail of Lever Frame bench (96 levers) by Stevens, Glasgow Pattern. The floor below this is called the Locking Room. This contains the locking frame apparatus which operates the signals via levers, pulleys, chains and wires.
Records of the Royal Commission on the Ancient and Historical Monuments of Scotland (RCAHMS), Edinbu
8/2012
© Crown Copyright: HES

DP 143345
Interior. Signal Box. Detail of lever bench.
Records of the Royal Commission on the Ancient and Historical Monuments of Scotland (RCAHMS), Edinbu
8/2012
© Crown Copyright: HES

DP 143353
Interior. Signal Box. Lever Frame (96 levers) by Stevens, Glasgow Pattern. Detail of bench and beading where it meets the signal room floor.
Records of the Royal Commission on the Ancient and Historical Monuments of Scotland (RCAHMS), Edinbu
8/2012
© Crown Copyright: HES

DP 143369
Interior. Signal Box. Alloa Line modern signalling system.
Records of the Royal Commission on the Ancient and Historical Monuments of Scotland (RCAHMS), Edinbu
8/2012
© Crown Copyright: HES

DP 143370
Interior. Signal Box. Alloa Line modern signalling system.
Records of the Royal Commission on the Ancient and Historical Monuments of Scotland (RCAHMS), Edinbu
8/2012
© Crown Copyright: HES

DP 143373
Interior. Signal Box. Signalman operating levers.
Records of the Royal Commission on the Ancient and Historical Monuments of Scotland (RCAHMS), Edinbu
8/2012
© Crown Copyright: HES

DP 143380
Interior. Signal Box. Rear of lever bench
Records of the Royal Commission on the Ancient and Historical Monuments of Scotland (RCAHMS), Edinbu
8/2012
© Crown Copyright: HES

DP 143297
Interior. Locking Room. Locking Tray, non-track side. Detail, levers visible bottom.
Records of the Royal Commission on the Ancient and Historical Monuments of Scotland (RCAHMS), Edinbu
8/2012
© Crown Copyright: HES

DP 143298
Interior. Locking Room. Locking frame, track side. Detail. Left to right, lever tails (top) attached to links attached to vertical or pedestal 'L' cranks. The left hand tail is c. 18 inches usually for points and the one on the extreme right top of picture is about 27 inches in length and would be for signals. The switch boxes on the right are electric signal switches. The chains on the right are chains for the signal wires with its signal chain pulley.
Records of the Royal Commission on the Ancient and Historical Monuments of Scotland (RCAHMS), Edinbu
8/2012
© Crown Copyright: HES

DP 143300
Interior. Locking Room. Locking frame, track side. Details of electrical boxes attached to timber frame sending information to signal box.
Records of the Royal Commission on the Ancient and Historical Monuments of Scotland (RCAHMS), Edinbu
8/2012
© Crown Copyright: HES

DP 143302
Interior. Locking Room. Locking frame, track side. Stirrup connections to levers and pulley wheel. Detail.
Records of the Royal Commission on the Ancient and Historical Monuments of Scotland (RCAHMS), Edinbu
8/2012
© Crown Copyright: HES

DP 143303
Interior. Locking Room, track side. Locking frame, detail. View of electric locks (?) for either levers or for detection of signal change. The locking tray, levers and tails are visible top part of image.
Records of the Royal Commission on the Ancient and Historical Monuments of Scotland (RCAHMS), Edinbu
8/2012
© Crown Copyright: HES

DP 143314
Interior. Locking Room. Locking frame, detail. Signal chain pulleys.attached to signal wires
Records of the Royal Commission on the Ancient and Historical Monuments of Scotland (RCAHMS), Edinbu
8/2012
© Crown Copyright: HES

DP 143334
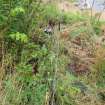
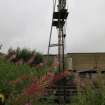
View from south of rare semaphore railway signal cluster at Stirling Station.
Records of the Royal Commission on the Ancient and Historical Monuments of Scotland (RCAHMS), Edinbu
8/2012
© Crown Copyright: HES

DP 143356
Interior. Signal Box. Stirling North Main Line. Block instrument on right, used in conjunction with telegraph.
Records of the Royal Commission on the Ancient and Historical Monuments of Scotland (RCAHMS), Edinbu
8/2012
© Crown Copyright: HES

DP 143362
Historic photograph (?1940s/50s) of interior of Stirling Middle Signal Box.
Records of the Royal Commission on the Ancient and Historical Monuments of Scotland (RCAHMS), Edinbu
8/2012
© Crown Copyright: HES

DP 143366
Interior. Signal Box. Alloa Line modern signalling system.
Records of the Royal Commission on the Ancient and Historical Monuments of Scotland (RCAHMS), Edinbu
8/2012
© Crown Copyright: HES

DP 143376
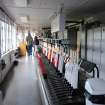
Interior. Signal Box. General view.
Records of the Royal Commission on the Ancient and Historical Monuments of Scotland (RCAHMS), Edinbu
8/2012
© Crown Copyright: HES
![Interior. Locking Room. Vertical Locking Tray and levers, track side. Detail. The [sword] tappets are visible at the top of the locking tray. The Locking Tray contains locking bars which connect to dogs to other dogs allowing locking or movement of the tappets (in turn connected to the levers operated from the first floor of the signal box). This is a Glasgow 'new style' design of vertical locking tray.](http://i.rcahms.gov.uk/canmore/s/DP00143299.jpg)


- Council Stirling
- Parish Stirling
- Former Region Central
- Former District Stirling
- Former County Stirlingshire
Note (14 August 2012)
This is a Caldonian Railway type N2 box which opened in 1901. As of 1997, its lever frame contained 96 levers. The frame originally sat nearer the bay window to allow the signalman a clear view along the tracks. The original lever frame was a Stevens GNP of 1901 frame (absolute block working). The locking room windows have been removed and bricked up.
P Kay, 1997; http://www.signalbox.org/gallery/sc/stirlingmiddle.php (retrieved 14-08-2012). Semiphore signals at NS7993 appear to be still in use.
This was visited as part of the improvement of Canmore with reference to signal boxes in ownership of Network Rail and earmarked for significant change over the next 20 years.
Information from RCAHMS (MMD) 14 August 2012.

