
Following the launch of trove.scot in February 2025 we are now planning the retiral of some of our webservices. Canmore will be switched off on 24th June 2025. Information about the closure can be found on the HES website: Retiral of HES web services | Historic Environment Scotland
Auchenreoch Muir, Starfish


Decoy Site (20th Century)
Site Name Auchenreoch Muir, Starfish
Classification Decoy Site (20th Century)
Alternative Name(s) Clyde Aa Defences; Square Wood; Auchenreoch Burn; Garshake Burn
Canmore ID 229065
Site Number NS47NW 68
NGR NS 4206 7783
NGR Description Centred NS 4206 7783
Datum OSGB36 - NGR
Permalink http://canmore.org.uk/site/229065


- Council West Dunbartonshire
- Parish Dumbarton
- Former Region Strathclyde
- Former District Dumbarton
- Former County Dunbartonshire
NS47NW 68.00 centred 4206 7783
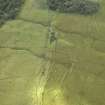
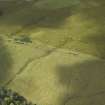
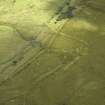
The remains of a WWII Starfish decoy (SF 13h) are visible at this location on RAF air photographs (58/A/419: 5199, 5200) taken on 19 June 1949 and All Scotland Survey air photographs (51588: 021, 022) taken on 10 June 1988. The control bunker is situated 400m to the S (see NS47NW 68.01). At least 8 bomb craters lie within 800m of the site.
Information from RCAHMS (KM) 3 December 2002.
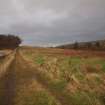
The remains of the decoy site are visible on recent air photography taken in September 2007 (RCAHMS 2007) on the slope between the Auchenreoch Burn and the Garshake Burn.
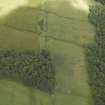
The decoy site consists of least fourteen small concrete platforms situated immediately to the W of a track running NE-SW, which would have supported various types of oil burning trays and structures for pyrotechnic effects. The control bunker is about 540m to the S between Square Wood and the Garshake Burn (NS47NW 68.01). The site overlies an area of rig-and-furrow cultivation.
What may be the remains of the access track curving from the existing track round the S end of the site, are also visible on the photographs.
At least one, possibly two bomb craters survive (NTS47NW ) at NS 41997 78096 and NS 41934 78173 on moorland to the W.
Information from RCAHMS (DE), December 2007.
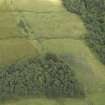
The control bunker for Starfish decoy site SF 13h is visible on RAF air photographs taken in 1949 (58/A/419: 5199 and 5200) and All Scotland Survey air photographs (51588: 021 and 022) taken on 10 June 1988. It lies 400m S of the decoy site (NS47NW 68.00).
Information from RCAHMS (KM) 3 December 2002.
The bunker is visible on recent air photography (RCAHMS 2007), with the entrance on the S elevation.
The control bunker is depicted on the current OS 1:2500 scale digital map and situated on sloping ground between Square Wood and the Garshake Burn.
Information from RCAHMS (DE), December 2007.
Field Visit (6 December 2017)
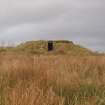
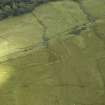
A control shelter, 7 fire trench enclosures, 29 concrete platforms and a well-engineered metalled road are all that has been observed of this World War Two Civil Starfish Decoy, which is visible on RAF air photographs (58/A/419: 5199-5200) flown in 1949 and All Scotland Survey Aerial Photographs (ASS/51588 021-2) flown on 10 June 1988. The site is one of 18 decoys that were constructed as part of the military infrastructure designed to protect the industries in the centre of Glasgow and along the banks of the River Clyde from aerial attack.
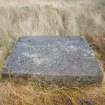
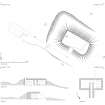
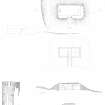
The control shelter (NS 42040 77540) is situated on a levelled terrace 475m NNE of Maryland farmhouse and 45m E of a metalled road that passes the S corner of Square Wood on the way to service the platforms in the SE sector of the decoy. The shelter is enclosed on the ENE and NNE by a ditch up to 3.6m broad and 0.7m deep. It measures 9m from WNW to ESE by 4m transversely over brick walls 0.38m thick and 2m high, within a grass-grown earthen blast wall up to 4m thick and 2.4m high. The flat, reinforced concrete roof, which has been waterproofed with a layer of bitumen, retains a turf capping, although this has eroded on the ESE. An escape hatch covered by a modern iron grill is located in the middle of its WNW edge. The grass-grown foundations of a brick baffle on the SSW, positioned 1.4m from the blast wall at the mid-point of the structure, shielded a canopied entrance above a raised concrete threshold leading into a corridor. Opposed entrances at its NNE end provide access to two square compartments that are flooded. The walls of the control room on the WNW have been cement rendered and whitewashed. It exhibits few fittings. However, 6 steel rungs attached to the WNW wall permit egress from the escape hatch, while missing fixtures are marked by voids or areas of discolouration in the walls’ render. A low plinth in the S corner marks the location of a stove and above this is a square aperture in the roof for a chimney. There are also rectangular vents connected to circular pipes just above floor level in the NNE and SSW walls, which emerge on the far side of the turf blast wall. The walls of the generator room on the opposite side of the corridor have also been cement rendered and whitewashed. It contains plinths for three engines, the one closest to the door being distinguished by a pair of small square cut-outs in its long sides. A wooden baton runs up the ESE wall and then horizontally along the ceiling above a large circular aperture high in the ESE wall. The latter, measuring 0.23m in diameter, emitted the exhausts from the generators, while three pipes just above floor level conducted gasses to the external expansion chambers of which there is little trace. Rectangular vents just above floor level close to the NNW and SSW corners of the room are connected to pipes, 0.4m in diameter, that emerge from the far side of the turf blast wall.
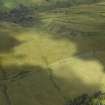
The grass-grown concrete foundation of an L-shaped building is situated about 7m WNW of the shelter. It is flush with the ground and measures 8m from WNW to ESE by 4.75m transversely over walls that were no more than 0.1m thick. The metalled road to the W continues on a NE course for another 350m before turning initially NW for about 90m and again sharply NE once more. In this length, where it measures about 4m wide and is accompanied by a ditch on the N, it runs for another 90m, immediately NW of a cluster of 16 rectangular concrete blocks situated in broken ground near the foot of a south facing slope (centred NS 42130 77975). These platforms, which are both rectangular and square on plan, occur in three distinct shapes and sizes. The four smallest, measuring about 1.5m square and up to 0.3m thick, sometimes retain T-shaped angle irons on their upper surface close by their corners. These are probably the supports of metal tanks, but evidence for these and other kinds of iron fitting are much rarer on the larger platforms, which are grouped loosely into six pairs – one platform of the pair measuring about 3.5m by 2m and 0.5m thick, while the other measures about 6.5m by 1m and 0.3m thick. A smaller cluster of platforms is situated on the crest of the slope about 80m NE (centred NS 42195 78085). This comprises one small square platform and two pairs of the larger types. In addition, there are two further groups situated further NW. One comprising two pairs (centred NS 42020 78075) is situated about 20m SE of a bomb crater (see below), while the other comprising one pair, a long thin platform and a small square platform, is situated on the slope above the Auchenreoch Glen (centred NS 42055 78185).
The earthworks shown faintly on the aerial photographs survive, but they are for the most part very difficult to discern at ground level. The best preserved is a curvilinear enclosure situated on the summit of the hill (NS 42029 78167), which measures 28.5m from WNW to ESE by 18.5m transversely, within a grass-grown, scraped-up earth bank 2.4m thick and up to 0.7m high. Its SW arc appears to be overlain by the most north-westerly of four rectangular enclosures (NS 42010 78157, NS 42023 78142, NS 42042 78119 and NS 42055 78105) measuring about 23m from NE to SW by 8m transversely, within earth banks up to 2m thick and 0.2m high. They appear to have been laid out in pairs, each being sub-divided into three compartments. A similar pair is situated about 280m ENE (NS 42280 78226 and NS 42308 78202).
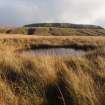
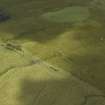
Three bomb craters (NS41939 78171, NS 42002 78096 and NS 41840 77988) are situated within the decoy. They measure 8m-15.5m in diameter and up to 1.4m deep. All are surrounded by a low ring of upcast measuring up to 1.75m thick and 0.3m high. The two larger craters on the S-facing slope immediately below the summit of the hill contain standing water, but the smallest situated about 190m SW is simply a dry grass-grown hollow.
Visited by HES, Survey and Recording (ATW, GFG) 6 December 2017.
Measured Survey (30 October 2018)
HES surveyed Auchenreoch Muir decoy site, control centre with plane-table and GPS on 30 October 2018 at a scale of 1:100. The resultant plan and sections were redrawn in vector graphics software at a scale of 1:200.

