
North Sutor, Coast Battery


Coastal Battery (First World War), Gun Emplacement(S) (First World War)
Site Name North Sutor, Coast Battery
Classification Coastal Battery (First World War), Gun Emplacement(S) (First World War)
Alternative Name(s) Cromarty Defences; Fort North Sutor; Site No. 1
Canmore ID 170741
Site Number NH86NW 9.02
NGR NH 81955 68912
NGR Description NH 81955 68912 and NH 81989 68962
Datum OSGB36 - NGR
Permalink http://canmore.org.uk/site/170741


- Council Highland
- Parish Nigg (Ross And Cromarty)
- Former Region Highland
- Former District Ross And Cromarty
- Former County Ross And Cromarty
NH86NW 9.02 81955 68924 and 81989 68962
Two World War I gun-emplacements for 9.2-inch guns.
The World War I open gun-emplacements are situated adjacent to the World War II coast batteries in covered emplacements. The two 9.2-inch guns were manned by the Royal Navy.
J Guy 2000; NMRS MS 810/10, Vol.2, 80, Vol.3, 46
Note (29 July 2013)
A coast battery comprising two emplacements for 9.2-inch guns, built by the admiralty to a designed influenced by the mounting and operation of a heavy gun on a Royal Navy ship.
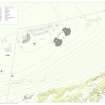
Plans of the battery on completion in 1914 (The National Archives WO 78/5192) show the arrangement of the battery. The guns faced SE, with a Gun Group Commander post situated mid way between the guns. The guns were numbered No. 1 and No. 2. The SW emplacement with crew shelter to its NE was numbered No.1 and the NW emplacement with its crew shelter to the SW was numbered No. 2. The two emplacements were mirror images of each other connected by a trench or sunken passageway. To the rear of the guns was the access down to the magazine, with steps and crane to lower ammunition. The plans show the arrangement of drainage and the voice pipes to carry orders from the Gun Group Commanders post to the guns.
The guns were mounted on an egg-shape barbette sunk into the concrete. Around the guns towards the Moray Firth side was an apron of concrete. The shells and cordite were hoisted up from the magazine directly below, as it would be on a ship. There are no ready ammunition lockers around the emplacement, so when operational the shells and cordite were passed up directly into the gun as required.
Each magazine lay below the gun emplacement, comprising two rooms and passageways with access via stairs to the rear. Originally some light was provided by windows to the shell store but these were later blocked up. Two doors entered the magazine, one into the shell store and one, via a lobby, into the magazine (cordite). The magazine did not have natural light and only light was provided by a electric safety lighting, enclosed behind glass in a recess in the wall beside a second doorway to a passageway between the shell store and the magazine, from which a further short passageway extended to the shaft containing the hoist to the gun.
The Second World War 6-inch guns reused both magazines which were adapted with new access shafts for the hoists built. The windows and the doors to the shell room were sealed at this time.
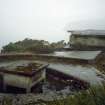
After the military left the site the camp site was bulldozed and much of the building rubble was pushed into the magazine access. Such is the depth of rubble that it also covered up the No.1 gun crew shelter and only the top of the Gun Group Commanders post can be seen. The top of the small crane that lowered ammunition and cordite down to the magazine is still in situ to the rear of No.1 gun.
Information from RCAHMS (AKK) 29 July 2013.
Project (March 2013 - September 2013)
A project to characterise the quantity and quality of the Scottish resource of known surviving remains of the First World War. Carried out in partnership between Historic Scotland and RCAHMS.
Field Visit (13 March 2019)
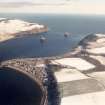
Two gun emplacements, which were introduced by the Admiralty during the First World War, are situated immediately SE of a service road running SW from a junction 23.5m SSE of the North Gate (NH86NW 9.77). Each was armed with a 9.2-inch Naval gun and they mirror one another architecturally. Both installations were equipped with their own crew shelter and underground magazine and they were manned by the Royal Marine Artillery.
The emplacements are positioned about 34m apart overlooking the rough gorse and grass-grown scarp that falls steeply to the SE. No.1 gun, which is situated to the SW, has been established upon a slightly more substantial stretch of the terrace that was excavated to accommodate them; but the only trace of the sunken passage that once linked them is a rubble-filled linear hollow in the immediate vicinity of the command post (NH86NW 9.59), which is located mid-way between and co-ordinated their fire. Both guns were secured within reinforced cast concrete barbettes that are lenticular on plan and measure 6.2m from NW to SE by 4.7m transversely, but that at Gun No.2 has been partly covered on the NW by demolition debris bulldozed from elsewhere on the site. Each barbette is surrounded by a raised platform 2.2-3.7m broad, topped by a chamfered parapet 0.42m in height, which in its turn is fronted by a gently falling apron of reinforced concrete measuring up to 13.3m in breadth – although this is now largely obscured by vegetation. Both parapets exhibit clusters of sockets at intervals around their rims, some of which still retain short metal posts with perforated eyes near the top. In the centre of the barbettes is a flat-roofed, concrete canopy supported on four short legs that dates from the Second World War. This protects an escape hatch from the underground magazine, but the shaft was originally constructed to allow cordite from the magazine to reach the guns. The roofs of the canopies slope gently downward to the NW, while an opening on their SE was originally closed with a pair of sheet metal doors. However, only one remains in place and that is attached to the canopy in Gun No.1.
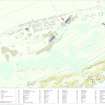
The magazines for both guns are buried beneath the barbettes. Although they form part of the original Naval arrangement, both magazines were incorporated into the neighbouring covered emplacements that were introduced by the Army in the Second World War (NH86NW 9.06). During the First World War, access was by a flight of steps that descended a stairwell to the NW of the barbettes, but these stairwells are now almost wholly buried under rubble and the magazines can now only be reached by ramps from the later emplacements. A simple metal derrick, which still remains in place above the stairwell behind the SW barbette, is a rare survival. The magazines comprise two principal compartments: a store for the shells and another for the cordite, but only the magazine associated with Gun No.1 was accessed on the date of visit. Its shell store, which is rectangular on plan and measures 6.75m from NE to SW by 4.02m transversely and 2.75m in height, is situated in the NE part of the complex. A door (now blocked by rubble) originally provided access from the stairwell, while two windows looking out on to this lit the room from the NE. However, the windows were blocked-up when the compartment was converted to a cordite store for the Second World War emplacement. The walls are rendered with cement and there are fittings on the floor for shelving around the walls. The shell hoist was reached from the S corner of the room, where it was situated in a small lobby connected to the cordite store. This lobby also provided access to another where the cordite hoist was situated directly below the gun. This shaft was converted into the escape hatch in the Second World War and now contains a metal ladder running up to the centre of the barbette. The cordite store in the SW part of the complex could only be entered originally from a door in the stairwell that is now also blocked-up. This originally led into the shifting lobby from which a door provided admission to the room. Like the shell store, it is also rectangular on plan and measures 5.78m from NW to SE by 4.02m transversely and 2.75m in height. Clusters of vertical wooden buffer batons are attached at intervals to the cement rendered walls and also on the walls of the lobbies. They measure about 1.7m in height and 0.1m broad and have penciled numbers at their apices, although these figures do not follow a logical sequence. It may be recalled that the arrangement of the guns in these emplacements follows that adopted by the Navy on their warships, where similar batons were used to line the magazines - the intention being to keep the cordite away from heat when the engines lay near, or from the cold and damp where a wall was close to the hull. Just as the configuration of the guns were brought over wholesale, so also quite possibly the magazine fittings - the numbers perhaps being added to the batons at the time of a dismantlement, in order to make sure that they all arrived safely at their new destination. Fixings on the floor again relate to the method of storage. Two rectangular openings in the NW wall held electrical safety lights behind glass, while the aperture of the ramp leading up to the Second World War emplacement emerges from the wall on the SW just above floor-level. The floors and ceilings of the whole complex are whitewashed, as only the shell store originally benefitted from natural light.
Little is to be seen of the crew shelters, as they are largely buried under demolition debris, although parts of their flat, grass-grown roofs are visible.
A new plan of what remains of the SW emplacement was prepared in the course of this visit, but contemporary plans and sections are held in the National Archives at Kew (WO78/5192: 3/19, 4/19, 6/19, 16/19), in addition to an unnumbered plan showing the later modifications sketched out for the Second World War battery. The emplacements are also depicted on two RAF aerial photographs (106G/RAF/0751/6039-40) flown on 31 August 1945.
Visited by HES, Survey and Recording (ATW, AKK, HLS, AMcC), 13 March 2019.

