 |
On-line Digital Images |
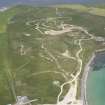
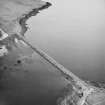
SC 376130 |
RCAHMS Aerial Photography |
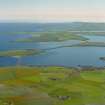
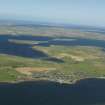
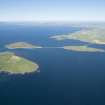
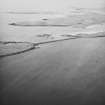
Oblique aerial view from N. Visible are the Islands of Lamb Holm, Glimps Holm and Burray. Part of the village of St Mary's is also visible. |
4/8/1997 |
Item Level |
|
 |
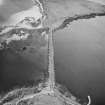
On-line Digital Images |
DP 053202 |
RCAHMS Aerial Photography Digital |
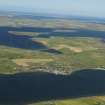
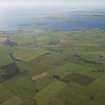
General oblique aerial view centred on Lamb Holm airfield with the causeways adjacent, taken from the ENE. |
23/9/2008 |
Item Level |
|
 |
On-line Digital Images |
DP 053203 |
RCAHMS Aerial Photography Digital |
General oblique aerial view centred on Lamb Holm airfield with the causeways adjacent, taken from the NE. |
23/9/2008 |
Item Level |
|
 |
On-line Digital Images |
DP 053204 |
RCAHMS Aerial Photography Digital |
General oblique aerial view centred on Lamb Holm airfield with the causeways adjacent, taken from the NNE. |
23/9/2008 |
Item Level |
|
 |
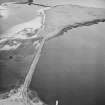
On-line Digital Images |
DP 068047 |
RCAHMS Aerial Photography Digital |
Oblique aerial view of Burray with the Churchill Barriers and Mainland beyond, taken from the S. |
5/8/2009 |
Item Level |
|
 |
On-line Digital Images |
DP 068048 |
RCAHMS Aerial Photography Digital |
Oblique aerial view of Burray with the Churchill Barriers and Mainland beyond, taken from the S. |
5/8/2009 |
Item Level |
|
 |
On-line Digital Images |
DP 092223 |
RCAHMS Aerial Photography Digital |
Oblique aerial view of Churchill Barrier No. 2, taken from the ESE. |
23/7/2010 |
Item Level |
|
 |
On-line Digital Images |
DP 092227 |
RCAHMS Aerial Photography Digital |
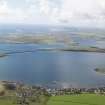
General oblique aerial view of St Mary's looking towards Glimps Holm and Churchill Barrier No. 2 with Burray and South Ronaldsay beyond, taken from the NNE. |
23/7/2010 |
Item Level |
|
 |
On-line Digital Images |
DP 142979 |
RCAHMS Aerial Photography Digital |
General oblique aerial view of The Bu, Burray, South Ronaldsay and Churchill Barrier No. 2, looking NNW. |
18/7/2012 |
Item Level |
|
 |
On-line Digital Images |
DP 142980 |
RCAHMS Aerial Photography Digital |
General oblique aerial view of The Bu, Burray, South Ronaldsay and Churchill Barrier No. 2, looking NNW. |
18/7/2012 |
Item Level |
|
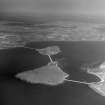 |
On-line Digital Images |
SC 1438424 |
Aero Pictorial |
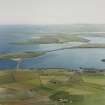
Causeways connecting Orkney mainland, with Burray via Lamb Holm and Glims Hold South Ronaldsay, Orkney, Scotland. Oblique aerial photograph taken facing North/East. |
3/6/1955 |
Item Level |
|
 |
On-line Digital Images |
SC 1438425 |
Aero Pictorial |
Causeways connecting Orkney mainland, with Burray via Lamb Holm and Glims Hold South Ronaldsay, Orkney, Scotland. Oblique aerial photograph taken facing North/East. |
3/6/1955 |
Item Level |
|
 |
On-line Digital Images |
DP 243830 |
Historic Environment Scotland |
Oblique aerial view. |
16/8/2016 |
Item Level |
|
 |
On-line Digital Images |
DP 243831 |
Historic Environment Scotland |
Oblique aerial view. |
16/8/2016 |
Item Level |
|
 |
On-line Digital Images |
DP 243834 |
Historic Environment Scotland |
Oblique aerial view. |
16/8/2016 |
Item Level |
|
 |
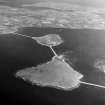
On-line Digital Images |
SC 1681983 |
RCAHMS Aerial Photography |
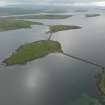
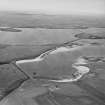
Oblique aerial view from SW, centred on Barrier No. 3 and showing the island of Glimp's Holm in the centre left of the photograph. Barriers No's. 1 and 2 are visible in the top right-hand corner area. |
13/6/1995 |
Item Level |
|
 |
On-line Digital Images |
SC 1681984 |
RCAHMS Aerial Photography |
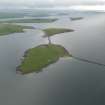
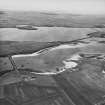
Oblique aerial view from S, centred on the island of Glimp's Holm, and showing barrier No.3 in the centre left of the photograph. Barriers No's. 1 and 2 are visible in the top right-hand corner area. |
13/6/1995 |
Item Level |
|
 |
On-line Digital Images |
SC 1681985 |
RCAHMS Aerial Photography |
Oblique aerial view from E, centred on the Barrier, and showing the wreck of the blockship Elton in the centre left of the photograph, and traces of Air-raid Shelters and a Tramway on Glimps Holm in the top left-hand corner. |
13/6/1995 |
Item Level |
|
 |
On-line Digital Images |
SC 1681986 |
RCAHMS Aerial Photography |
Oblique aerial view from NE, centred on the Barrier, and showing the wreck of the blockship Elton in the centre left of the photograph, and traces of Air-raid Shelters and a Tramway on Glimps Holm in the top right-hand corner. |
13/6/1995 |
Item Level |
|
 |
On-line Digital Images |
SC 1681987 |
RCAHMS Aerial Photography |
Oblique aerial view from NNE, centred on the Barrier, and showing traces of Air-raid Shelters and a Tramway on Glimps Holm in the top right-hand corner. Barrier No. 3 is visible in the top half of the photograph. |
13/6/1995 |
Item Level |
|
 |
On-line Digital Images |
SC 1681988 |
RCAHMS Aerial Photography |
Oblique aerial view from N, centred on the Barrier and the wreck of the blockship Elton. |
13/6/1995 |
Item Level |
|
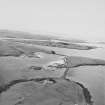 |
On-line Digital Images |
SC 1681991 |
RCAHMS Aerial Photography |
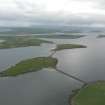
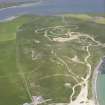
Oblique aerial view from NE, centred on Barriers No. 2 and 3, and showing Lamb Holm quarry and Battery in the bottom left-hand corner of the photograph. |
13/6/1995 |
Item Level |
|
 |
On-line Digital Images |
SC 1681994 |
RCAHMS Aerial Photography |
Oblique aerial view from NNW, centred on the Barrier, and showing Lamb Holm quarry in the centre left of the photograph. |
13/6/1995 |
Item Level |
|
 |
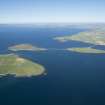
On-line Digital Images |
SC 1682391 |
RCAHMS Aerial Photography |
Oblique aerial view from N. Visible are the Islands of Lamb Holm, Glimps Holm and Burray. Part of the village of St Mary's is also visible. |
4/8/1997 |
Item Level |
|


