Accessibility

Font Size

100% 150% 200%

Background Colour

Default Contrast
Close Reset

Clyde Defences, Portkil Battery, 6-inch Gun Emplacements

Gun Emplacement(S) (First World War), Gun Emplacement(S) (20th Century)

Site Name Clyde Defences, Portkil Battery, 6-inch Gun Emplacements

Classification Gun Emplacement(S) (First World War), Gun Emplacement(S) (20th Century)

Alternative Name(s) Fort Road

Canmore ID 106349

Site Number NS28SE 39.01

NGR NS 24906 80540

NGR Description NS 24890 80537 and NS 24919 80527

Datum OSGB36 - NGR

Permalink http://canmore.org.uk/site/106349

Ordnance Survey licence number AC0000807262. All rights reserved.
Canmore Disclaimer. © Bluesky International Limited 2025. Public Sector Viewing Terms

Toggle Aerial | View on large map

Digital Images

Oblique aerial view of Clyde defences, Portkil Battery centred on the 6-inch gun battery emplacments with the 4.7-inch emplacements adjacent, taken from the NNW.
Oblique aerial view of Clyde defences, Portkil Battery centred on the 6-inch gun battery emplacments with the 4.7-inch emplacements adjacent, taken from the NNW.Oblique aerial view of the 6-inch gun emplacements and Battery Observation and Fire Control Posts, looking W.Portkil, plan and section of cartridge liftNo.2, 6-inch gun emplacement. South east platform. View from NW.No.1, 6-inch gun emplacement.  NW platform. View from W.Interior of crew shelter.Interior. Detail of barrel vaulted ceiling and brackets in crew shelter.Interior of crew shelter. Detail of brackets.Interior of NW shell store.Interior of NW shell store. Detail of brackets.Interior of NW shell store. Detail of No. 1 gun cartridge hoist.Interior of SE magazine. Detail of Nos. 8 and 9 light recesses.6-inch gun battery. Detail of ceramic ventilation pipe.No. 2, 6-inch gun emplacement. SE platform. Detail of metal anchor loop on inside wall of glacis.6-inch gun battery. Detail of air brick.Oblique aerial view of the 6-inch gun emplacements and Battery Observation and Fire Control Posts, looking E.No.2, 6-inch gun emplacement. South east platform. View from NE.No.2, 6-inch gun emplacement. South east platform. View from NE.No. 1, 6-inch gun emplacement. NW platform. View from N (with cartridge hoist hatch closed.)No. 1, 6-inch gun emplacement. NW platform showing light recess, cartridge locker and hatch of the cartridge hoist. View from NW.Interior of crew shelter, detail of stove base.Interior of crew shelter. Detail of windows.Interior of NW shell store with bricked up shell hoist on right side of facing wall.Interior of NW shell store. Detail of brackets.Interior of Royal Artillery store. detail of backets on SW wall.Detail of NW crew shelter chimmney. View from SW.6-inch gun battery. Detail of ceramic ventilation pipe.No. 2, 6-inch gun emplacement. SE platform. View from SE.6-inch gun battery, interior of SE shell store. Detail of ceiling vent.View down cartridge hoist shaftOblique aerial view centred on the 6-inch gun battery emplacments with the 4.7-inch emplacements adjacent, taken from the NW.Oblique aerial view of the 6-inch gun emplacements and Battery Observation and Fire Control posts, looking S.Oblique aerial view of the 6-inch gun emplacements and Battery Observation and Fire Control Posts, looking SE.Oblique aerial view of the 6-inch gun emplacements and Battery Observation and Fire Control Posts, looking WSWView of access stairways and magazine, store and crew shelter from NW.No. 1, 6-inch gun emplacement. NW platform. View from N (with cartridge hoist hatch open.)No. 1, 6-inch gun emplacement. NW platform. Detail of ammunition lockers.Interior of crew shelter, detail of window and brackets on wall.Interior of crew shelter. Detail of window sill with metal cover over ventilation duct.Interior of magazine.Interior of SE shell store looking towards entrance.No. 2, 6-inch gun emplacement. SE platform. Detail of china fragment in wall.6-inch gun battery, interior of SE shell store. Detail of original sash and case window.Portkil battery. Plan of 6-inch gun emplacement, HES survey drawingOblique aerial view of the 6-inch gun emplacements and Battery Observation and Fire Control Posts, looking SW.Rear of No.1 6-inch gun emplacement and Battery Observation Post. General view from NW.No. 1, 6-inch gun emplacement. NW gun platform and glacis with Fire Command Post and Battery Observation Post to rear. View from S.Interior of NW shell store. View of No. 1 gun cartridge hoist.Interior of NW shell store. View of No. 1 gun cartridge hoist.Detail of SE crew shelter chimmney. View from S.No. 2, 6-inch gun emplacement. SE platform. View from NE.No. 2, 6-inch gun emplacement. SE platform. Detail of cartridge hoist shaft.Oblique aerial view centred on the 6-inch gun battery emplacments with the 4.7-inch emplacements adjacent, taken from the W.No. 1, 6-inch gun emplacement. NW platform access stair to gun platform. View from NE.Interior of NW shell store. View of No. 1 gun cartridge hoist and issue hatch.Interior of SE magazine.Interior of magazine.6-inch gun battery. Detail of cut metal brackets which once supported a metal stair and walkway to the Battery Observation post. View from NE.No. 2, 6-inch gun emplacement. SE platform. Detail of cartridge hoist shaft.6-inch battery. Detail of water pipe.6-inch gun battery, interior of SE magazine. Detail of sliding door of issue hatch with nos. 8 and 9 light recesses above.Oblique aerial view centred on the 6-inch gun battery emplacments with the 4.7-inch emplacements adjacent, taken from the SW.No. 1, 6-inch gun emplacement. NW platform. Detail of cartridge hoist shaft.Interior of crew shelter. Detail of brackets.Interior of NW shell store. Detail of window.Interior of NW magazine.Interior of SE magazine. Detail of No. 9 light recess showing evidence of fixings for a glass plate.Interior of SE shell store looking towards entrance.6-inch battery, detail of metal railings. View from NW.No. 2, 6-inch gun emplacement. SE platform. View from NW.6-inch gun battery. Detail of ventilation grate below window.Publication Illustration. Portkil battery, plan and section of 6-inch gun emplacement and magazine storeOblique aerial view centred on the 6-inch gun battery emplacments, taken from the NE.Oblique aerial view of the 6-inch gun emplacements and Battery Observation and Fire Control Posts, looking NNW.No. 1, 6-inch gun emplacement. NW platform. Detail of cartridge hoist hatch.No. 1, 6-inch gun emplacement. SE platform. Detail of lift shaft and hatch door. Written on the rear of the hatch door are the words 'CARTRIDGE SHAFT'.Interior of crew shelter.6-inch gun battery. View of stair from W.Interior of NW shell store.Interior. View entrance from exterior through to shifting lobby and then to magazine.Interior of shell store.  Detail of signage above door to magazine from shifting lobby.6-inch battery, detail of metal railings. View from E.6-inch gun battery. Detail of metal railings.No. 2, 6-inch gun emplacement. SE platform. Detail of alcove for light.6-inch gun battery, interior of SE shell store. Detail of plaque on cartridge hoist.Oblique aerial view centred on the 4.7-inch gun battery emplacements with the 6-inch gun  emplacements adjacent, taken from the S.Oblique aerial view of the 6-inch gun emplacements and Battery Observation and Fire Control Posts, looking NNE.6-inch gun battery. General view from E.No. 1, 6-inch gun emplacement. NW platform. View from N.No. 1, 6-inch gun emplacement. NW platform. Detail of cartridge hoist timber lined lift shaft.6-inch gun battery. View of stair and crew shelter from SE.6-inch gun battery. View of stair and magazine doorway from NW.Interior of NW shell store. Detail of No. 1 gun cartridge hoist.Interior of shell store. Detail of signage above door to shifting lobby.Interior of NW shell store. View of No. 1 gun cartridge hoist.No. 2, 6-inch gun emplacement. Detail of metal cover on gun platform over the access to the gun pit.6-inch gun battery, interior of SE shell store. Detail of bricked up shell hoist and angled light recess.Portkil battery, 6-inch gun emplacement magazine stores, plan and section. HES survey drawingPublication Illustration: Portkil, plan and section of cartridge lift

Administrative Areas

  • Council Argyll And Bute
  • Parish Rosneath
  • Former Region Strathclyde
  • Former District Dumbarton
  • Former County Dunbartonshire

World War One Audit of Surviving Remains (5 July 2013)

The 6-inch emplacements and their magazine below are as described. Drawings on War Office file (The National Archives WO 78/ 5184) show the plan of the battery and arrangement of rooms in the underground part. The rooms directly between and below the battery where the shell store and cartridge store. Opposite those rooms across a passageway and under the road were the crew shelter for 24 men. At either end of the passageway there is a store rooms, one for lamps and a R.A. store.

Information from HS/RCAHMS World War One Audit Project (GJB) and RCAHMS (AKK) 5 July 2013.

Archaeology Notes

NS28SE 39.01 24890 80537 and 24919 80527

Previously recorded as NS28SW 26.00

Noted as Gun Site (dis) on OS 1:10000 scale map (1993).

Information from RCAHMS (DE), June 2002

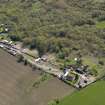
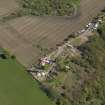
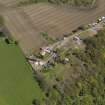
These two 6-inch gun emplacements, which fall on map sheet are part of Portkil Battery. They are visible on postwar vertical air photographs (CPE/Scot/ 350, 5210-5211, flown 17 April 1948) as two circular emplacements with gun officers position between and to the rear, with a sunken magazine below. Other ancilliary buildings can be seen to the NW. What may be a further buildings (NS28SE 39.08) can be seen about 90m to the SE. All of these features are depicted on the current digital OS 1:2500 scale maps.

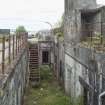
A rifle range (NS28SE 39.14) is also visible running due S from the gun emplacements.

Information from RCAHMS (DE), March 2003

Activities

Project (March 2013 - September 2013)

A project to characterise the quantity and quality of the Scottish resource of known surviving remains of the First World War. Carried out in partnership between Historic Scotland and RCAHMS.

Field Visit (17 May 2016)

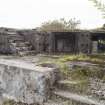
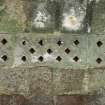
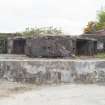
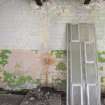
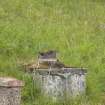
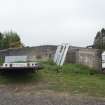
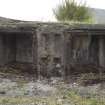
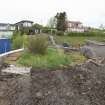
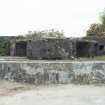
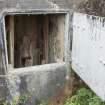
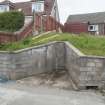
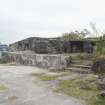
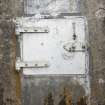
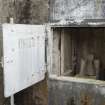
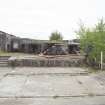
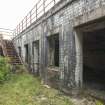
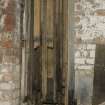
The two 6-inch gun emplacements at Portkil are situated 17.5m apart on a natural SW-facing terrace some 280m from the beach. They are set some 40m back from the steep cliff that defines the face of the terrace and they are approached from the SE by a public road (Fort Road). The two emplacements are similar, each having been provided with a concrete glacis to the front (SW) and both with gun-pits in which the holdfasts for the guns are overgrown and partly filled with rubble and earth. There is a concrete gun platform around both gun-pits, which are accessed by steps at the rear; two metal plates cover two entrance passages into each gun-pit. On the exterior wall below the gun platform there are ready ammunition lockers and fixings for metal doors and for the handrails of the gun platform. Leading off from the emplacements are walls containing more ready ammunition or cartridge lockers. A metal door of a cartridge lift can be seen on both emplacements. Recent work to create car parking adjacent to the SE gun emplacement has resulted in the removal of a section of original floor. On the rear wall of each emplacement and on the road surface is evidence of the laying down shelter (The National Archives WO78/5184).

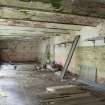
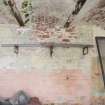
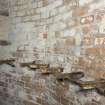
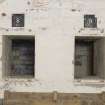
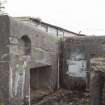
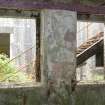
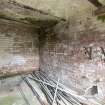
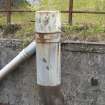
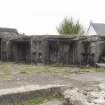
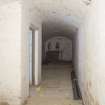
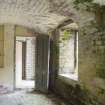
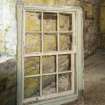
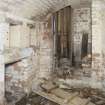
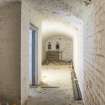
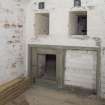
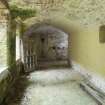
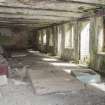
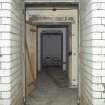
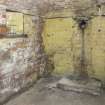
Situated between the emplacements is a small telephone room and the raised battery observation post containing its rangefinder pillar. This was accessed via a metal staircase which overhung the courtyard below but has been removed. The rooms occupying the long space underneath the emplacements was accessed from the sunken white glazed brick lined courtyard immediately to the NE and comprised a shell store and a magazine/cartridge store. The shell store, which ran the entire length of the NE side of this level was entered via double doors from the courtyard from where light was provided through six broad sash and case windows. The store has brick-lined walls and an arched ceiling, and there are bricked-up shell hoists at either end. The magazine/cartridge store ran parallel to the shell store, separated by a thick wall with four narrow windows containing thick glass to prevent sparks reaching the explosive cartridges. Between the shell store and the magazine was a ‘shifting lobby’ where men would be required to rid themselves of any potentially hazardous equipment, items or clothing before proceeding into the brick arched magazine. There was a hatch at both ends of the magazine, through which cartridges could be fed towards hoists situated in the shell store, one below each gun emplacement.

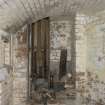
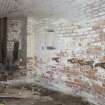
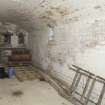
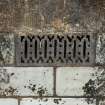
On the NE side of the sunken courtyard is a crew shelter which comprises a large brick-lined room with steel joists supporting a brick-built arched roof. The remains of wooden block flooring and two stove bases are present as is evidence for ventilation in both the roof and floor. Other evidence for the actual occupation and use of the building takes the form of fixtures such as coat hooks attached to the brick walls. At the SE end of the courtyard there is a room that was used as an RA store; a smaller room at the NW end was a lamp room.

Visited by HES Survey and Recording (AM, HS, AKK) 17 May 2016.

Measured Survey (18 May 2016)

HES surveyed the cartridge lift of the 6-inch gun emplacement, Portkil battery on 18 May 2016 at a scale of 1:5. The resultant plan and section were redrawn in vector graphics software at a scale of 1:20.

Measured Survey (16 May 2016)

HES surveyed Portkil battery 6-inch gun emplacement on 16 May 2016 at a scale of 1:100. The resultant ground plan and upper floor plan were redrawn in vector graphics software at a scale of 1:200.

Measured Survey (16 May 2016 - 18 May 2016)

HES surveyed Portkil Battery 6-inch gun emplacement magazine stores between 16-18 May 2016 at a scale of 1:100. The resultant plan and section were redrawn in vector graphics software at a scale of 1:200.

References

MyCanmore Image Contributions


Contribute an Image

MyCanmore Text Contributions