 |
On-line Digital Images |
SC 503708 |
RCAHMS Aerial Photography |
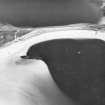
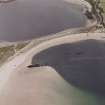
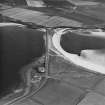
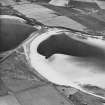
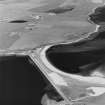
Scanned image of oblique aerial view showing Churchill Barrier No. 4, taken from the ESE, centred on the wreck of the blockship Pontos, and showing the wrecks of the Lorne and Carron in the centre right of the photograph. |
13/6/1995 |
Item Level |
|
 |
On-line Digital Images |
SC 642573 |
Records of the Royal Commission on the Ancient and Historical Monuments of Scotland (RCAHMS), Edinbu |
View from North |
|
Item Level |
|
 |
On-line Digital Images |
SC 940810 |
RCAHMS Aerial Photography |
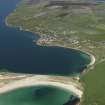
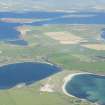
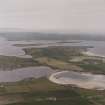
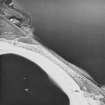
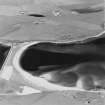
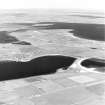
Scanned image of oblique aerial view, from SE, centred on the island of Burray and Churchill Barrier No. 4, and showing Burray village in the left centre of the photograph. |
13/6/1995 |
Item Level |
|
 |
On-line Digital Images |
DP 067961 |
RCAHMS Aerial Photography Digital |
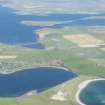
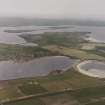
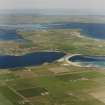
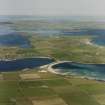
General oblique aerial view looking across Churchill Barrier No. 4 and Water Sound towards the village of Burray, taken from the SE. |
12/5/2009 |
Item Level |
|
 |
On-line Digital Images |
DP 243824 |
Historic Environment Scotland |
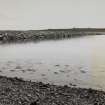
Oblique aerial view. |
16/8/2016 |
Item Level |
|
 |
On-line Digital Images |
DP 243825 |
Historic Environment Scotland |
Oblique aerial view. |
16/8/2016 |
Item Level |
|
 |
On-line Digital Images |
SC 1681898 |
RCAHMS Aerial Photography |
Oblique aerial view, from SE, centred on the wreck of the blockship Pontos, and showing the wrecks of the Lorne and Carron in the centre right of the photograph. |
13/6/1995 |
Item Level |
|
 |
On-line Digital Images |
SC 1681899 |
RCAHMS Aerial Photography |
Oblique aerial view from S, centred on the island of Burray and showing Burray Village in the centre left of the photograph, and Churchill Barrier No. 4 in the right centre. N Cara Mound is visible in the centre foreground. |
13/6/1995 |
Item Level |
|
 |
On-line Digital Images |
SC 1681900 |
RCAHMS Aerial Photography |
Oblique aerial view from SSE, centred on the island of Burray and showing Burray Village in the centre left of the photograph, and Churchill Barrier No. 4 in the right centre. N Cara Mound is visible in the bottom left-hand corner. |
|
Item Level |
|
 |
On-line Digital Images |
SC 1681901 |
RCAHMS Aerial Photography |
Oblique aerial view, from SE, centred on the island of Burray and Churchill Barrier No. 4, and showing Burray village in the left centre of the photograph. |
13/6/1995 |
Item Level |
|
 |
On-line Digital Images |
SC 1681974 |
RCAHMS Aerial Photography |
Oblique aerial view from SW. |
13/6/1995 |
Item Level |
|
 |
On-line Digital Images |
SC 1681975 |
RCAHMS Aerial Photography |
Oblique aerial view from SSW. |
13/6/1995 |
Item Level |
|
 |
On-line Digital Images |
SC 1681976 |
RCAHMS Aerial Photography |
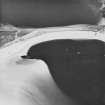
Oblique aerial view from SSE, centred on the wreck of the blockship Pontos, and showing Cara Battery in the bottom right-hand corner area of the photograph. |
13/6/1995 |
Item Level |
|
 |
On-line Digital Images |
SC 1681977 |
RCAHMS Aerial Photography |
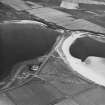
Oblique aerial view from ESE, centred on the wreck of the blockship Pontos, and showing the wrecks of the Lorne and Carron in the centre right of the photograph. |
13/6/1995 |
Item Level |
|
 |
On-line Digital Images |
SC 1681978 |
RCAHMS Aerial Photography |
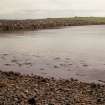
Oblique aerial view from E, showing the wrecks of the blockships Lorne and Carron in the bottom half of the photograph. |
13/6/1995 |
Item Level |
|
 |
On-line Digital Images |
SC 1681979 |
RCAHMS Aerial Photography |
Oblique aerial view from ENE, showing the wrecks of the blockships Lorne and Carron in the bottom left-hand corner of the photograph. |
13/6/1995 |
Item Level |
|
 |
On-line Digital Images |
SC 1682036 |
RCAHMS Aerial Photography |
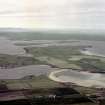
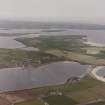
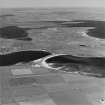
Oblique aerial view of Orkney, South Ronaldsay, Burray and South Ronaldsay, Churchill Barrier No.4 with the village of Burray taken from the S. The view N also shows the Churchill Barriers Nos.1, 2 and 3 with Lamb Holm and Glimps Holm. |
4/8/1997 |
Item Level |
|
 |
On-line Digital Images |
SC 1682335 |
RCAHMS Aerial Photography |
Oblique aerial view of Orkney, South Ronaldsay, Burray and South Ronaldsay, Churchill Barrier No.4 and the blockship, steamship Collingdoc taken from the SW. |
4/8/1997 |
Item Level |
|
 |
On-line Digital Images |
SC 1682336 |
RCAHMS Aerial Photography |
Oblique aerial view of Orkney, South Ronaldsay, Burray and South Ronaldsay, Churchill Barrier No.4 and the blockship, steamship Collingdoc taken from the S. Also visible is the Second World War Cara coastal battery. |
4/8/1997 |
Item Level |
|
 |
On-line Digital Images |
SC 1682416 |
RCAHMS Aerial Photography |
Oblique aerial view of Orkney, Burray, general view taken from the S of Burray, Burray village and all four Churchill Barriers. |
4/8/1997 |
Item Level |
|
 |
On-line Digital Images |
SC 1682417 |
RCAHMS Aerial Photography |
Oblique aerial view of Orkney, Burray, general view taken from the S of Burray, Burray village and all four Churchill Barriers. |
4/8/1997 |
Item Level |
|
 |
On-line Digital Images |
SC 1682418 |
RCAHMS Aerial Photography |
Oblique aerial view of Orkney, Burray, general view taken from the SSE of Burray, part of Burray village and the four Churchill Barriers. |
4/8/1997 |
Item Level |
|
 |
On-line Digital Images |
SC 1693820 |
RCAHMS Aerial Photography |
Oblique aerial view of Orkney, South Ronaldsay, Burray and South Ronaldsay, Churchill Barrier No.4 with the village of Burray taken from the S. The view N also shows the Churchill Barriers Nos.1, 2 and 3 with Lamb Holm and Glimps Holm. |
4/8/1997 |
Item Level |
|
 |
On-line Digital Images |
SC 2596318 |
Records of the Royal Commission on the Ancient and Historical Monuments of Scotland (RCAHMS), Edinbu |
View from N. |
29/5/1996 |
Item Level |
|


