 |
On-line Digital Images |
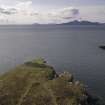
DP 175319 |
Dr Colin and Dr Paula Martin |
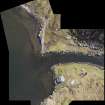
Headland fort, aerial view from drone looking S. (Edward Martin) |
2008 |
Item Level |
|
 |
On-line Digital Images |
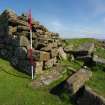
DP 175320 |
Dr Colin and Dr Paula Martin |
Headland fort, entrance. Scale 2 metres. (Colin Martin) |
2008 |
Item Level |
|
 |
On-line Digital Images |
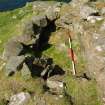
DP 175321 |
Dr Colin and Dr Paula Martin |
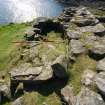
Headland fort, intramural chamber adjacent to entrance. Scale 2 metres. (Colin Martin) |
2008 |
Item Level |
|
 |
On-line Digital Images |
DP 175322 |
Dr Colin and Dr Paula Martin |
Headland fort, interior of wall showing scarcement. Scale 2 metres. (Colin Martin) |
2008 |
Item Level |
|
 |
On-line Digital Images |
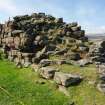
DP 175323 |
Dr Colin and Dr Paula Martin |
Headland fort, detail of chamber and external wall (on right) showing evidence of re-build. Scale 2 metres. (Colin Martin) |
2008 |
Item Level |
|
 |
On-line Digital Images |
DP 175324 |
Dr Colin and Dr Paula Martin |
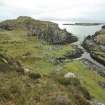
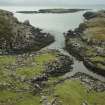
Headland fort (skylined, on left), the two nausts below it, and the canal leading into Loch na h-Airde. The islet of Sgeir Mhòr and the sheltered anchorage lie beyond. (Colin Martin) |
2008 |
Item Level |
|
 |
On-line Digital Images |
DP 175325 |
Dr Colin and Dr Paula Martin |
Headland fort (skylined, on left), the two nausts below it, and the canal leading into Loch na h-Airde. The islet of Sgeir Mhòr and the sheltered anchorage lie beyond. Rum is on the horizon, and the headland on the far left is Dùnan Thalasgair on Eigg, which according to tradition was a watch-post and signal-stance linked to Rubh’ an Dùnain. (Colin Martin) |
2008 |
Item Level |
|
 |
On-line Digital Images |
DP 175326 |
Dr Colin and Dr Paula Martin |
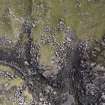
Vertical photograph by aerial drone of the two nausts with their upper hauling bays. (Edward Martin) |
2008 |
Item Level |
|
 |
On-line Digital Images |
DP 175327 |
Dr Colin and Dr Paula Martin |
The nausts at mid-tide, with the water just beginning to enter the lower basins. (Colin Martin) |
2008 |
Item Level |
|
 |
On-line Digital Images |
DP 175328 |
Dr Colin and Dr Paula Martin |
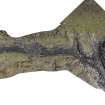
Rectified vertical photomosaic of the canal, quay, and nausts taken by aerial drone. (Edward Martin) |
2008 |
Item Level |
|
 |
On-line Digital Images |
DP 175329 |
Dr Colin and Dr Paula Martin |
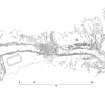
Interpretative survey drawing derived from the rectified vertical photomosaic of the canal, quay, and nausts. (Colin Martin) |
2008 |
Item Level |
|
 |
On-line Digital Images |
DP 175330 |
Dr Colin and Dr Paula Martin |
Oblique panorama of the upper canal and nausts. (Edward Martin) |
2008 |
Item Level |
|
 |
On-line Digital Images |
DP 175331 |
Dr Colin and Dr Paula Martin |
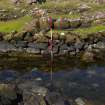
The upper canal from the edge of the northernmost naust. The 2-m pole marks a distinctive change in the stonework of the revetment on the far side of the canal. (Colin Martin) |
2008 |
Item Level |
|
 |
On-line Digital Images |
DP 175332 |
Dr Colin and Dr Paula Martin |
Detail of the change in the stonework between the lower and upper sectors of the canal. Scale 2 metres. (Colin Martin) |
2008 |
Item Level |
|
 |
On-line Digital Images |
DP 175333 |
Dr Colin and Dr Paula Martin |
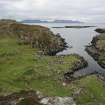
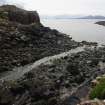
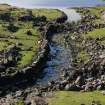
The lower end of the canal’s outlet to the sea, photographed at low water. This sector is not strictly a canal, but a cleared strip which runs towards the nausts to facilitate landing. Even so, some revetment to the edges is evident. The headland fort is visible at the upper left. (Colin Martin) |
2008 |
Item Level |
|
 |
On-line Digital Images |
DP 175334 |
Dr Colin and Dr Paula Martin |
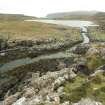
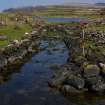
The upper canal leading into Loch na h-Airde. The naust entrances are partly obscured (centre right), while the blockage of the canal towards its entrance into the loch is clear. (Colin Martin) |
2008 |
Item Level |
|
 |
On-line Digital Images |
DP 175335 |
Dr Colin and Dr Paula Martin |
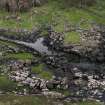
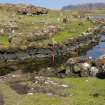
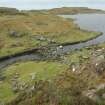
The upper canal leading into Loch na h-Airde, with the blockage part-way along it. The left-hand revetment is relatively intact, but that on the right appears to have been dismantled to its foundations and the stones thrown onto the bank. Tradition asserts that this was done to bring larger vessels into the loch. (Colin Martin) |
2008 |
Item Level |
|
 |
On-line Digital Images |
DP 175336 |
Dr Colin and Dr Paula Martin |
The upper canal leading into Loch na h-Airde, with the blockage part-way along it. The left-hand revetment is relatively intact, but that on the right appears to have been dismantled to its foundations and the stones thrown onto the bank. Tradition asserts that this was done to bring larger vessels into the loch. Scale 2 metres. (Colin Martin) |
2008 |
Item Level |
|
 |
On-line Digital Images |
DP 175337 |
Dr Colin and Dr Paula Martin |
The upper canal leading into Loch na h-Airde, with the blockage part-way along it. (Colin Martin) |
2008 |
Item Level |
|
 |
On-line Digital Images |
DP 175338 |
Dr Colin and Dr Paula Martin |
Oblique photomosaic taken from an elevated pole of the canal blockage. Scales 2 metres. (Edward Martin) |
2008 |
Item Level |
|
 |
On-line Digital Images |
DP 175339 |
Dr Colin and Dr Paula Martin |
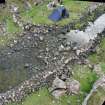
Rectified vertical mosaic taken by aerial drone of the stone-built quay features on either side of the canal entrance into Loch na h-Airde. (Edward Martin) |
2008 |
Item Level |
|
 |
On-line Digital Images |
DP 175340 |
Dr Colin and Dr Paula Martin |
Tumbled stonework from the quay on the E side of the canal entrance into Loch na h-Airde. (Colin Martin) |
2008 |
Item Level |
|
 |
On-line Digital Images |
DP 175341 |
Dr Colin and Dr Paula Martin |
The edge of the quay on the E side of the canal entrance into Loch na h-Airde. (Colin Martin) |
2008 |
Item Level |
|
 |
On-line Digital Images |
DP 175342 |
Dr Colin and Dr Paula Martin |
The edge of the quay on the E side of the canal entrance into Loch na h-Airde. (Colin Martin) |
2008 |
Item Level |
|


